

Parging with NHL 5, a stone foundation with NHL 5, and waterproofing materials. Parging mixtures with lime and Portland.
About the House
We are the proud owners of a pre-Civil War two-story brick home in the small town of Derry, PA, about one hour east of Pittsburgh.
Although we do not yet know the exact date of construction, documents found at our local historical society date the home between 1820 and 1840. We were able to locate our home on the 1857 Westmoreland County map, so we know it was built before the Civil War began in 1861. We have also been fortunate to find several artifacts buried on our property dating back to the mid 1800’s – bricks, stoneware, glassware, buttons, horseshoes, nails, etc.
We are quite happy to own a piece of local history; however, we understand that sometimes historic homes require renovations and come with big surprises. Our surprise came in February of 2018, about 6 months after we purchased our home. I remember walking down my basement steps, turning on the light, and then stepping in about 3 inches of water. Surprise, our basement was flooded.
A Leaking Basement
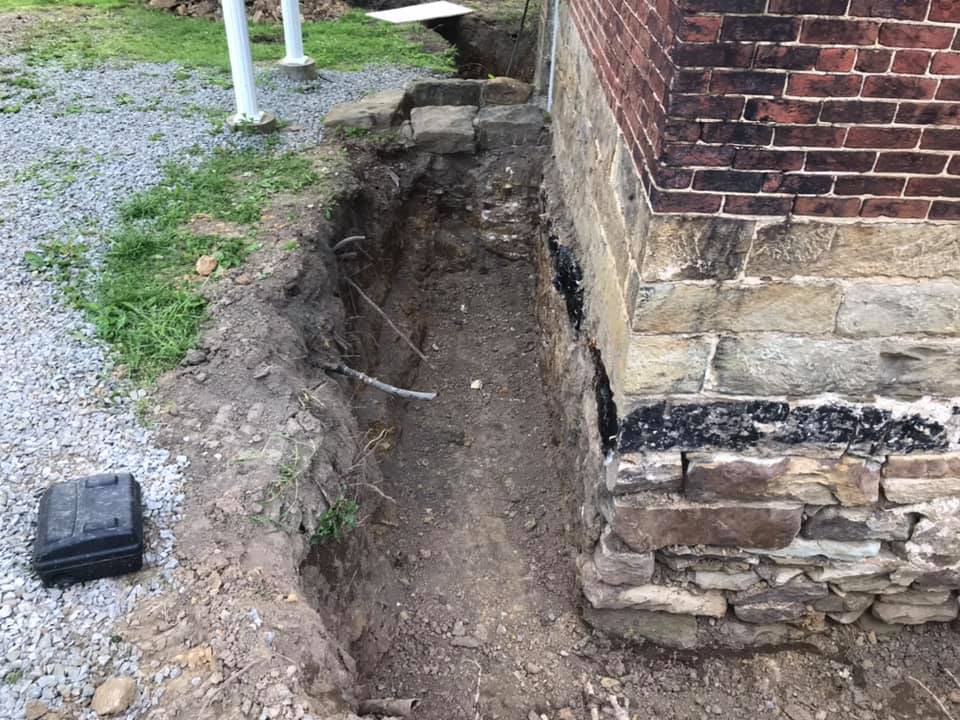
The reason for our basement leaking was due to improper installation of our waterline. After excavating around the foundation, we discovered that our entire waterline was run inside of black perforated pipe (French Drainage Pipe). Due to this, a large portion of water from our front yard was flowing into that pipe and draining into our basement.
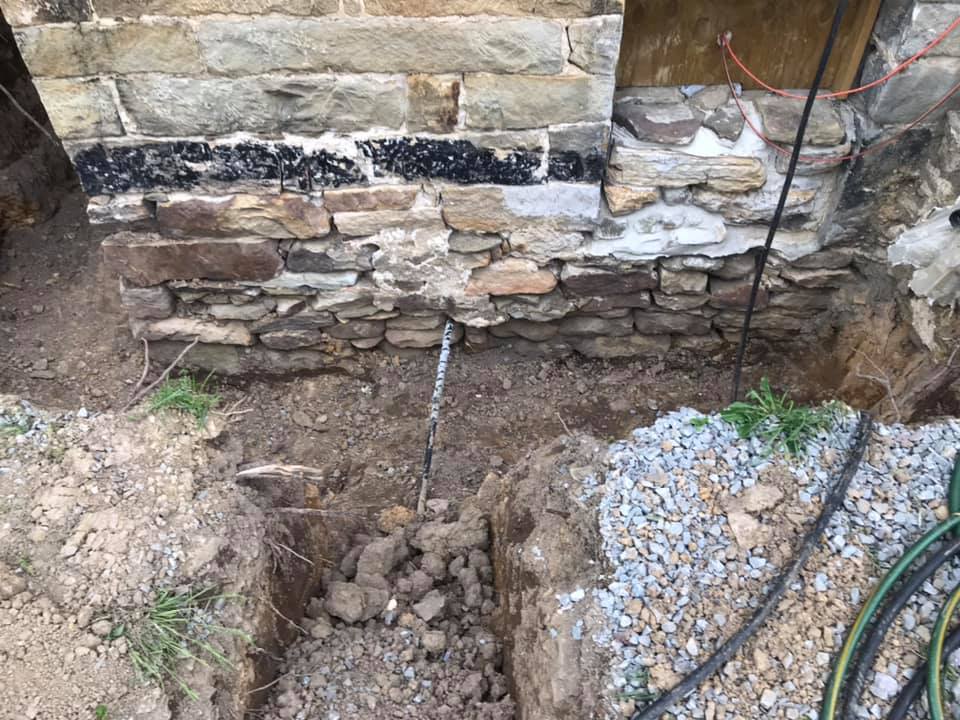
You can see from the pictures the amount of mortar loss that occurred due to this problem. After hand cleaning and pressure washing the foundation, large voids between the stones were revealed. Stones and mortar fell out as we cleaned the foundation wall. Furthermore, since the home is almost 200 years old, it does not have a typical “footer”.
The home was built on solid bedrock. We spent about a week sloping the bedrock properly so a base of mortar could be poured in effort to direct water away from the foundation and into drainage piping.
Where do we start?
When this project started, we had absolutely no idea where to begin. Several contractors recommended that we apply surface bonding/hydraulic cement to the foundation to fill the voids and stop water penetration. However, after doing some research on historic homes and mortar types, that solution did not seem correct. We consider ourselves quite lucky to have found Mr. Andy deGruchy (Limeworks.us Owner) and his team at Limeworks.us.
It is amazing what a simple Google search with the phrase “Lime Mortar + Pennsylvania” can locate. I started speaking with Mr. deGruchy in April 2019. I provided him with the details of our project, and he provided me with solutions…immediately. Saint-Astier Natural Hydraulic Lime (NHL 5) was the recommended material to restore our foundation.

Step 1
The Pointing Mixture
Mr. deGruchy personally took time to respond every email and answer all my questions. He highlighted the tools I should use for the job and provided me with 3 specific mortar mixtures to be used in restoring our foundation. They were as follows:
1. Pointing Mixture: NHL 5 (1 Part), Concrete Sand (2 Parts)
2. Level Coat/Brown Coat Parging Mixture: Binder Blend - LimeCrete Binder
3. Finish Coat Parging Mixture: Binder Blend - LimeCrete Binder
First, we used this mixture to make a smooth base over the bedrock so that we could lay our drainage pipe. Next, we used the Pointing Mixture to fill the voids between the last course of stone and the bedrock. Lastly, we pointed the entire stone foundation. Our foundation had a great deal of mortar loss and deep voids, so we had to replace/add several stones during the restoration. We pointed the foundation in “lifts”, gradually building up layers until the foundation was ready for parging. We used tuck pointers, furring strips, and our hands to pack the mortar between the stones. We waited 10 days between “lifts” and then another 10 days before parging with the Level Coat/Brown Coat Mixture.
Dug out foundation
NHL 5 Base over bedrock

Repointed Foundation

Deep Voids Filled with NHL 5

Step 2
Level Coat/Brown Coat Parging Mixture
We used the Level Coat/Brown Coat Parging Mixture to make our wall flat. We did this by securing furring strips (vertically) to the foundation wall every 2 feet with masonry screws. Once the furring strips were plumb and secure, we applied the Level Coat/Brown Coat Parging Mixture in 1-inch lifts between the furring strips, allowing 1 day to dry before adding another coat. We finished each layer with a masonry brush, so it was easier for the subsequent coats to stick. ***Please note that we were able to apply the Level Coat/Brown Coat Parging Mixture daily because the mixture contained the LimeCrete Binder.***
Framing

Parging Coat Lift One

Parging Coat Lift Two

Parging Coat Lift Two

Step 3
Finish Coat Parging Mixture: Binder Blend
The last layer of mortar we applied was the Finish Coat Parging Mixture. This coat was approximately 3/4” to 1” thick. We built this final coat out to the front of the vertical furring strips and finished it smooth with a trowel. We allowed the Finish Coat Parging Mixture to dry for about two weeks.
Finish Coat over framing

Finishing Touches for Parging
After the Finish Coat Parging Mixture was dry, we completed the tedious task of removing all the furring strips. When removing the furring strips, some mortar chipped away from the foundation wall. Mr. deGruchy told us that this would occur and could be easily patched when filling in the voids left by the furring strips. We filled in the voids with small stones and the Finish Coat Parging Mixture. It took about 3 or 4 “lifts” to completely fill the voids left by the furring strips. We then allowed the entire foundation to dry for nearly two weeks.
Prior to applying our waterproofing materials, Mr. deGruchy advised us to check the mortar with a moisture meter. The mortar’s moisture content had to read between 15-18% before the waterproofing materials could be applied. We tested our mortar in several places along the foundation wall and our readings registered between 9-14%. We then applied our waterproofing materials.
We used a combination of a peel and stick membrane, rubberized foundation tar, dimple board, and French Drains to waterproof our exterior foundation walls below grade. This will ultimately ensure that the historic structure above the surface is in the “the best state of conservation”.
Primer

Tar, Peel, and Stick Membranes

Dimple Board

NHL 5 - Flexibility, Breathability, and Permeability
These parging mixtures are also an excellent choice as a below grade exterior application because they combine the flexibility, breathability, and permeability of the NHL 5 with the strength of LimeCrete Binder.
The goal of our project was to decrease moisture levels, terminate water infiltration through our foundation walls, and fix voids to eliminate pest infestations. In addition to completing the exterior waterproofing, we also stripped the interior foundation walls of a previous rubber/latex waterproof coating. Coating interior historic stone basement walls with a modern rubber/latex waterproofing agent does not allow the foundation walls to breathe and release water vapor.
Should water/moisture enter the foundation wall from the outside, and the interior wall contains a latex/rubber waterproof coating, the water can become trapped and move upwards through the wall, rotting joist ends and framing members. For this reason, we removed all the waterproof coatings from our interior foundation walls prior to restoring and waterproofing our exterior foundation. NHL 3.5 (possibly mixed with Borax to inhibit mold growth) would be the appropriate parge coating to add to the interior foundation walls as opposed to a modern rubber/latex waterproofing agent or a parging coat consisting solely of Portland Cement.
Working with NHL 5
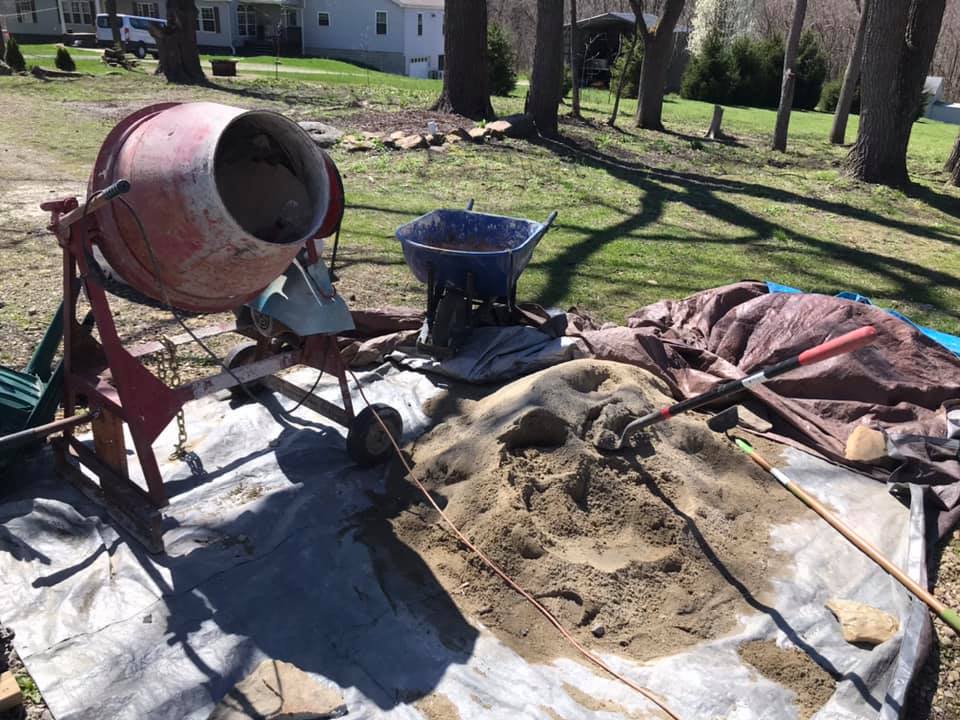
It is quite important to ensure the mortar is mixed thoroughly. We always dry mixed the materials in a cement mixer for about 15 minutes to make a consistent blend. We then added water slowly as the mixer was rotating, being careful not to add more than necessary. We allowed the mortar to mix with the water for about 20 minutes. We then let the mortar sit for about 15-30 minutes to “fatten up”. Mr. deGruchy stressed that “better mixes are drier mixes packed in” and that “water is a tool” used to help the mortar adhere to the stone.
If you attempt to point without misting the stone (especially on a hot day), the mortar can dry too quickly, crack, and fail to adhere. Furthermore, misting the mortar with water is critical to encourage a “slow cure” and deter cracking. Sometimes we misted our mortar 3 times per day when the temperature was very hot. We used burlap to cover the mortar to protect it from the elements (sometimes misting the burlap as well). One of the great properties of the NHL 5 is its unique rework ability. After pointing/parging, we were able to mist and then rework the mortar the following day to repair hairline cracks, small voids, etc.
Keeping your structure "High and Dry"
Mr. de Gruchy explained the rationale for using the LimeCrete Binder as the parging mixture in the following way: If moving a historic brick/stone structure, it would be ideal to place it atop a new block or poured-in-place foundation that is properly waterproofed and equipped with correct drainage. This keeps the historic structure “high and dry”. Since we are not moving our home atop a new foundation, we used the parging mixtures containing LimeCrete Binder combined with modern waterproofing materials to protect our below grade exterior foundation and keep our home dry above the surface. This should protect the integrity of our home for the foreseeable future.


My home was built in 1892, and my fieldstone walls are leaking. My walls are damp in places, and in one area, I have a puddle of water after a storm/heavy rain. I don’t want to dig on the inside to install a sump pump, but I’ll like to keep the walls dry. I do need some repointing on the outside, but I’m not sure what product to use. Most of the repointing guys down here ask me to use concrete. I’ve read that the concrete won’t allow the foundation to move, but IDK.
Pls help!
Hi Lar, thanks for checking out our blog.
The problem with cement is not that your foundation can’t “move” (as it shouldn’t move much to begin with normally), it’s that cement-based mortars and parge coats have a combination of high density and high capillarity, meaning they suck up water and hold onto it for long periods of time. If you have soft historic masonry, it is often less dense than the cement and will result in water moving outwards from the masonry instead of through the mortar or parging. Water brings with it dissolved minerals that can crystallize in the masonry exerting pressure that blows it apart from the inside-out. Materials that hold onto water can also be problematic in climates where freeze-thaw is an issue since more water in the system means more ice (though this is usually not a problem below-grade except in very cold climates). This results in bad things like the masonry crumbling or water moving inside instead of outside.
That said, if you have running water in the basement, it is usually a sign that you may have a problem on the exterior. The first thing to do here is to look for common problems like the roof gutters sagging, leaking, or missing. Next time it rains, go outside and see where the water is pouring from on the roof. Sometimes fixing something as simple as the gutters can alleviate or greatly reduce water problems. The next thing to check is how the soil is oriented around your foundation. Over time, soil can shift and settle in such a way that it allows water to move towards the foundation instead of away from it. Related to this is if there are any sidewalks, driveways, or porches that might be graded improperly and allow water to pour in towards the foundation. Another common problem is if you finished the basement and have AC or heat running down there. Because the walls stay cool, the difference in air temperature can allow moisture to reach its dew point, turning from vapor to liquid. If this is your problem, you’d have to consider some kind of insulation to help regulate the temperature of the walls.
If all of those common problems are not the issue, then it may be time to consider digging down and doing something to the exterior. Minimally, you’ll want to repoint, but you may also need to consider a parge coat with an NHL mortar, most likely an NHL 5. Natural Hydraulic Limes are breathable compared to historic masonry and modern cement, and much more flexible than modern cement mortars. Unlike air-setting limes, NHLs are also able to be used underground since they set via hydration and not carbonation alone. Still, there are some considerations that have to be taken into account, such as letting the mortar dry out and cure for a bit before back filling. In addition, you should consider graded gravel with a French drain to take any excess water away from the foundation. If the water problem is severe enough or the cause cannot be located to be alleviated, then you can begin considering something like what this article is outlining.
Since every building is different, I can’t tell you exactly what yours needs here on this reply. I’d invite you to call or email our support so we can talk about this more and see about solutions for your unique building.
All impressive but I would be worried about wicking of moisture up through the under the base footing supporting the brick.
Water moves up the walls and migrate several stories. Common in the UK and Germany. There is a solution for wicking issues.
Hope all the work made was qorth it.
Thank you for sharing this informative article about parging. I hope there are a lot of mason contractors who could read this and be guided accordingly.
We have a house with 1900 brick foundation (crawlspace is 18″ dirt floor). We have radon and are considering encapsulating and insulation. We do have some damp spots in the crawlspace but it’s reasonably dry.
My question is:
– We are considering doing landscaping work and regrading. Should we consider putting a parge coat on at the same time?
– Will closed cell spray foaming the interior cause any issues with the masonry?
– Can you spray cc foam the interior AND parge the outside?
Hello Tessa,
Thanks for reading our blog and leaving a comment. I’m going to provide some general principals here, but you are welcome and encouraged to give us a call during business hours to discuss your specific project further.
1) Landscaping: You would want to do your parge coat before landscaping and plan to keep your landscaping back from contacting your wall as far as possible. Landscaping features like plants and mulch hold large amounts of moisture and so can encourage biological growth on your masonry, transfer salts into the material, or (in cold climates) increase the risk of freeze-thaw damage. A parge coat will help mitigate some of this risk, but you should plan for cyclical maintenance such as using D/2 to clean off any green or black scum that begins to grow on your masonry at least annually.
2) It’s hard to say for sure whether closed cell spray foam will cause issues. It certainly could if you are not properly allowing any moisture to dry out. Though you don’t want the bulk of your moisture drive to be drying to the interior, typically interiors do need at least a small amount of drying. However, it really does depend on your climate. In cold climates, you need to prevent too much moisture from reaching the dew point on the interior, but in humid climates you typically want more moisture to be able to move so it doesn’t collect. If you are in cold climate, check out this article by John Straube for some guidance on things to consider when insulating masonry: https://buildingscience.com/documents/digests/bsd-114-interior-insulation-retrofits-of-load-bearing-masonry-walls-in-cold-climates
3) Yes, you can spray foam and parge generally so long as your parging is vapor transmissive (aka “breathable”) such as an appropriate lime-based parging. Generally, unless the brick are very soft, you’d use an NHL 5-based parging for exterior at-grade brickwork. But on softer bricks, other materials like NHL 3.5 can be used so long as you understand they will have decreased long-term durability in these settings.
In all cases, you should wait at least 2 weeks and ideally 28 days after parging before landscaping or backfilling to give the lime time to cure.
Good evening, Can you recommend a mortar for a vintage 1903 home? We have some foundation brick that needs repointing. Our brick is softer than current brick but not as soft as some 1700 and 1800 properties. Thank you for the guidance.
Hello Stowe, please consider sending us a sample of your mortar. It’s difficult to recommend something on anything but general principles without seeing a sample. 1903 is right in the middle of the transition period from lime mortars to Portland cement mortars and so you might have anything from a pure lime more, to a pure cement mortar, to something in between. You can find details on how to send us a sample here: https://www.limeworks.us/services/#observation
Hi Anthony,
You mention NHL 5 for exterior and NHL 3.5 for interior foundation use. I am repointing my basement interior (river stone, circa 1895) where needed and adding a parge coat, but was advised to use NHL 5 because I am in the flood plain. Is this overkill/dangerous to the wall or the basement? Should I remove the relatively small section I have finished and redo it with 3.5?
Thanks!
Greetings, thanks for your question. NHL 5 is generally recommended in places where you are expecting lots of water or weathering as it is more resilient to these factors. However, the material should always be informed by the properties of the masonry. If your stone or brick are very soft and friable, you may end up having to use a lower strength NHL to ensure compatibility with the units. In your case, river stone are generally going to be durable if they have not been cut and shaped and are left in their rubble form so NHL 5 is most likely going to be fine. However, all buildings are different and I cannot say for certain what would be appropriate for your unique building without knowing more about the materials. If you are seeing signs of distress like chalky or flaking stones, cracking stones, and stone layers becoming debonded from one another, these might be signs you need to step back and consider a weaker strength NHL. Please feel free to use our contact form to reach out to me directly if you’d like to talk more about your project and what might be good or what to avoid.
I had hired a historic Mason to fill in some holes in my basement stone foundation and do some parging of a 1920 Philadelphia townhouse. I thought he was going to use NHL but instead he used a sand/lime/cement (6/2/1 ratio) mix for a stronger structural support and I guess quicker curing time. I’m planning on parging the entirety of the basement myself (for aesthetic, pest control reasons) could I put NHL 3.5 over the walls that contain mixture above? Or should I just use the same mixture as above or some sort of standard masonry mortar mixture. The basement does get quite a bit of moisture, never floods but has had a wet spot here or there. There is a dehumidifier down there running. Anyways appreciate it.
Sorry I meant a lime dust and cement mix. Not the one above.
In most cases, mortar is load transferring rather than load bearing, but there are times when the unique conditions of a building require a mortar to be a stronger load bearing surface so you should talk to your mason and see if there was a reason for the switch. By the 1920s in Philadelphia, it’s likely the mortar may have been a Portland cement anyway, so the Type O mix he used (the 6/2/1 ratio you mentioned) may be okay but it’s impossible to say for sure without knowing more about your building and its masonry. For what it’s worth, an NHL 3.5 will have very similar long term strength to this kind of cement-lime mortar, where it will differ is primarily in set time, rapidity of strength gain, density, and water vapor permeability.
In any event, yes you can usually use NHL 3.5 parging over top of a Type O cement-lime mortar. However, you should never put a Portland containing mix over top of an NHL. Materials should almost always go from more dense to least dense towards the surface, not the other way around.
There may be other conditions specific to your building that go beyond the general advice and theory offered here. Please feel free to reach out to our support by email, chat, or phone if you’d like to talk more about your project.